 

Ingredients:
One pair of jeans whose cuffs got caught in the bike spokes or that pair of perfectly worn cords that have one too many knee patches, that you still love anyway.
Heavy Embroidery Thread
Embroidery Needle
Seam Ripper
Scissors
Pins
Clean Floor
Big Wide Open Sheet of Newspaper
Pencil
Ruler
1/2 to 3/4 yard of fabric for your groovy personalized insert. The best options are cotton and wool and fabric that doesn't stretch.
Matching the fabric weight of your garment to be "formerly known as pants" helps it with its brand new identity. We like upholstery fabric, fake fur, weird scenic souvenir towels, or that old dress that needs an overhaul. Tartan plaid (pictured) is tres trendy for fall. Shorter skirt versions push the recycling envelope further by allowing you to use the leftover bottoms of your pants - as the inserts. Make these more "you" later, by embroidering on astrological signs or gluing sequins or glitter.
Optional sewing machine. We are not anti-machinery or anything, but we feel that in riding the craft wave, this skirt looks much cooler with some "obvious crafting embellishments" (ie hand-sewn and not-exactly-perfect) along the way.
Ten easy steps:
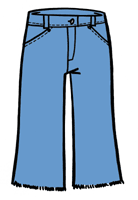 1)Try on your jeans and decide how long you want your skirt to be.
Leave them alone for maxi-length. If you want to recycle your pants bottoms as you skirt inserts, you'll need to salvage at least half the end length of the skirt in pant fabric.
1)Try on your jeans and decide how long you want your skirt to be.
Leave them alone for maxi-length. If you want to recycle your pants bottoms as you skirt inserts, you'll need to salvage at least half the end length of the skirt in pant fabric.
 2) Open the newspaper flat on the floor.
Lay your jeans flat on the paper, with the legs slightly apart, so they make an obvious triangle shape in the space between them, with the paper showing through.
2) Open the newspaper flat on the floor.
Lay your jeans flat on the paper, with the legs slightly apart, so they make an obvious triangle shape in the space between them, with the paper showing through.
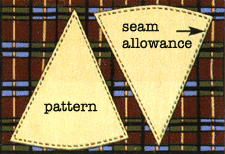
3) Draw a triangle shape guideline on the paper between the legs with the crotch as the highest point. Take the jeans away and correct your "pattern" by folding the triangle in half and making sure your sides are symmetrical. Add a half an inch on each side all the way up for seam allowance and any hem that you may want.
4) Cut out your triangle pattern. Pin it flat to your fabric either doubled (so you can cut both at once) - or singly. Pay attention to the direction of any fabric designs may be going and how you want them to look on your new skirt. Hint: If you cut your triangles out one at a time "head to toe", you can eke out more room from a smaller piece of fabric.
 5) Using your seam ripper, rip open the inside seams of each pant leg all the way across the crotch so you have a front and back that you can lay flat and look sort of like cowboys' chaps.
Start with a few stitches at a time so you can get an idea how tough - or worn and easy - the stitches are going to be to take out. Start on the outside with the double stitching and then go inside to finish the job. The older the jeans, the more headstrong the seam folds will be. Don't freak out at all the layers in the pants crotch. Just trim the excess from the underside so it lays a little flatter and less bulkily. Rip into the crotch by a few inches on both the front and back in order to compensate for the fact that the crotch line just isn't necessary anymore (pictured). Iron them flat if they won't behave.
5) Using your seam ripper, rip open the inside seams of each pant leg all the way across the crotch so you have a front and back that you can lay flat and look sort of like cowboys' chaps.
Start with a few stitches at a time so you can get an idea how tough - or worn and easy - the stitches are going to be to take out. Start on the outside with the double stitching and then go inside to finish the job. The older the jeans, the more headstrong the seam folds will be. Don't freak out at all the layers in the pants crotch. Just trim the excess from the underside so it lays a little flatter and less bulkily. Rip into the crotch by a few inches on both the front and back in order to compensate for the fact that the crotch line just isn't necessary anymore (pictured). Iron them flat if they won't behave.
6) Lay the "pants" flat on the floor and trim away any weird unsightly clumps of thread. Now you're ready to sew.
7) Attach one triangle to the front of your pants by turning the fabric seam allowance under along each leg as you pin.
The easiest way to do this is to place the triangle on top of its new
home and turn it's edges under while pinning downward every few inches - one side at a time. Start at the bottom so the hems match
and when you get to the top, tuck your triangle top between the two crotch flaps that you made when you were ripping (as pictured). Make sure all the pieces lie nice and flat before you start sewing. Rearrange your pinning if you have to.
8) Sew the pieces together either with an elaborate decorative stitch that your grandmother taught you, a seriously *@!&$k!-ed up stitch in homage to the deconstructionist and punk movements, or cleanly by machine (zig-zag or otherwise). Do the same thing with the back panel.
9) Try it on. Decide how long you want your end creation to be and mark your cutting point if you want one - or keep it long. Hem the bottom or leave it alone or cut the old jeans hem off if you prefer the frayed edge thing, which is our favorite.
10) Go out. Have fun.
Print out 1-2 straight up at 80%.
©Fashion Icon Inc. 2000 |